In this Swift programming tutorial we will learn how to implement Sign in with Twitter account button using Firebase Social Authentication and Swift. If you are interested in learning how to use Firebase Social Authentication to implement Sign-in with Google account or Facebook, please check the below two tutorials I have published earlier:
- Firebase Social Authentication. SignIn with Facebook Account in Swift,
- Firebase Social Authentication. SignIn with Google Account in Swift.
Create New or Open Existing Xcode Project
In my previous tutorial where I shared how to implement SignIn with Google account, I have created a very simple app with two views. One view with a login button and another view is a protected page which will open once the user authentication is successful. You can create this Xcode project with two views yourself of you can refer to my previous tutorial to see how I created a new Xcode project.
Create New or Open Existing Firebase App
Just like with Xcode project, in my previous tutorial I have create a new Firebase App to be used for Social Authentication functionality. In this tutorial I am going to continue using that Firebase app. If you followed my previous tutorial on Google Sign, then I am sure you would like to continue with existing Firebase app. Other wise, please refer to my previous tutorial to learn how to create a new Firebase app and how to add Firebase support to your iOS project
Sign in with Twitter Account
Before we start writing any Swift code to implement Sign in with Twitter account functionality for our mobile app, let’s go to the Firebase Console and enable Twitter as a sign in method.
Have a look at the image below:
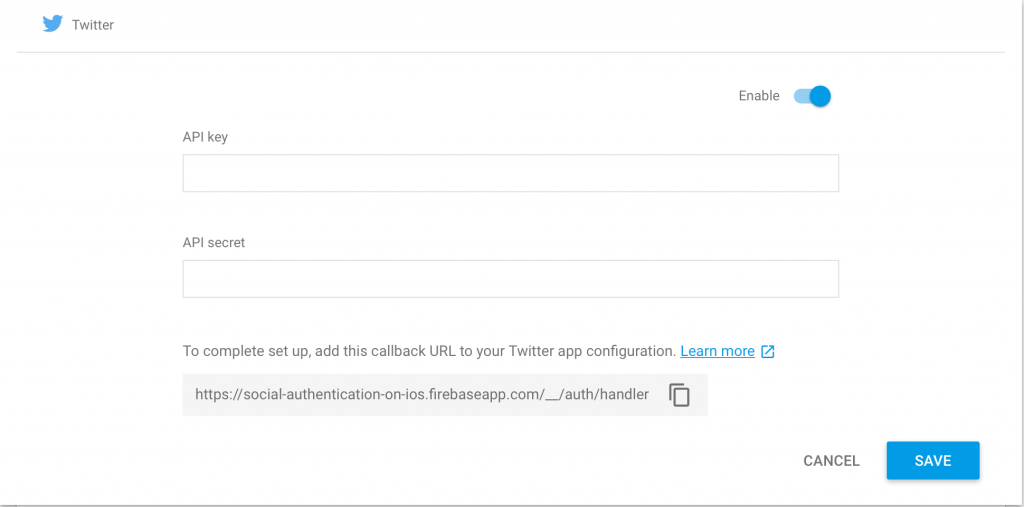
Before you can save the changes you have to provide the API Key and the API Secret which needs to be copied from Twitter app. So, let’s switch to https://apps.twitter.com, create a new app there and get API Key and API Secret.
- Open https://apps.twitter.com,
- Sign in with your Twitter account,
- Find the button called Create New App and click on it to create a new app.
When creating a new Twitter app, your app form should look similar to the image below:
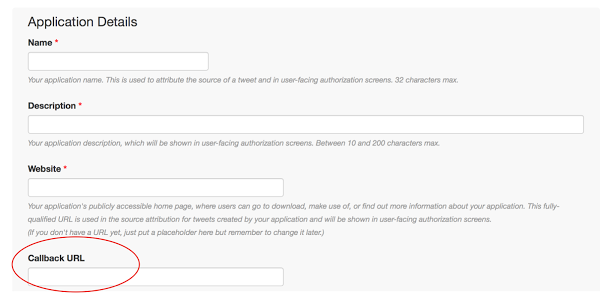
Copy the Callback URL from Firebase page and paste in into the Callback URL textfield here on Twitter App form. The provide App name, description and website URL and create a new Twitter app.
Once the Twitter app is created you should see the values of Consumer Key (API Key) and Consumer Secret (API Secret). These values are under the Keys and Access Tokens tab of your Twitter app.
Adding Firebase and Twitter Dependencies to Xcode Project
To let users Sign-in with their Twitter account to our app we will need to add Twitter library dependency to our Xcode project. And since we’ve started using Pods as dependency management we will use Pods once again to add the pod ‘TwitterKit’ in the Podfile.
My Podfile with Firebase, Google, Facebook and Twitter dependencies now looks like the one below:
# Uncomment the next line to define a global platform for your project
# platform :ios, '9.0'

target 'SocialAuthentication' do
  # Comment the next line if you're not using Swift and don't want to use dynamic frameworks
  use_frameworks!

  # Pods for SocialAuthentication

pod 'Firebase/Auth'
pod 'GoogleSignIn'
pod 'FBSDKCoreKit'
pod 'FBSDKShareKit'
pod 'FBSDKLoginKit'
pod 'TwitterKit'

end
Add Twitter Sign in Button Swift Code.
Let’s open our ViewController that contains Sign in buttons and import the Twitter library first. After importing Twitter library to my ViewController, the complete list of my imports looks like this:
import UIKit
import GoogleSignIn
import FBSDKLoginKit
import TwitterKit
import Firebase
Then add the following code to add the Twitter Sign in button to our ViewController and make it work:
//creating the Twitter sign in button
  fileprivate func configureTwitterSignInButton() {
      let twitterSignInButton = TWTRLogInButton(logInCompletion: { session, error in
          if (error != nil) {
              print("Twitter authentication failed")
          } else {
              guard let token = session?.authToken else {return}
              guard let secret = session?.authTokenSecret else {return}
              let credential = TwitterAuthProvider.credential(withToken: token, secret: secret)
              Auth.auth().signIn(with: credential, completion: { (user, error) in
                  if error == nil {
                      print("Twitter authentication succeed")
                  } else {
                      print("Twitter authentication failed")
                  }
              })
          }
      })

      twitterSignInButton.frame = CGRect(x: 120, y: 400, width: view.frame.width - 240, height: 40)
      self.view.addSubview(twitterSignInButton)
  }
After adding the above function to the view controller that also contains Facebook sign in and Google sign in buttons, it looks like this:
//
//  ViewController.swift
//  SocialAuthentication
//
//  Created by com.swiftdeveloperblog on 20/11/2017.
//  Copyright © 2017 com.swiftdeveloperblog. All rights reserved.
//

import UIKit
import GoogleSignIn
import FBSDKLoginKit
import TwitterKit
import Firebase


class ViewController: UIViewController, GIDSignInUIDelegate, FBSDKLoginButtonDelegate {

    override func viewDidLoad() {
        super.viewDidLoad()

        configureGoogleSignInButton()
        configureFacebookSignInButton()
        configureTwitterSignInButton()
    }

    //creating the Google sign in button
    fileprivate func configureGoogleSignInButton() {
        let googleSignInButton = GIDSignInButton()
        googleSignInButton.frame = CGRect(x: 120, y: 200, width: view.frame.width - 240, height: 50)
        view.addSubview(googleSignInButton)
        GIDSignIn.sharedInstance().uiDelegate = self
        //GIDSignIn.sharedInstance().signIn()
    }

    //creating the Facebook sign in button
    fileprivate func configureFacebookSignInButton() {
        let facebookSignInButton = FBSDKLoginButton()
        facebookSignInButton.frame = CGRect(x: 120, y: 200 + 100, width: view.frame.width - 240, height: 40)
        view.addSubview(facebookSignInButton)
        facebookSignInButton.delegate = self
    }

    //FBSDKLoginButton delegate methods
    func loginButton(_ loginButton: FBSDKLoginButton!, didCompleteWith result: FBSDKLoginManagerLoginResult!, error: Error!) {
        if error == nil {
            print("User just logged in via Facebook")
            let credential = FacebookAuthProvider.credential(withAccessToken: FBSDKAccessToken.current().tokenString)
            Auth.auth().signIn(with: credential, completion: { (user, error) in
                if (error != nil) {
                    print("Facebook authentication failed")
                } else {
                    print("Facebook authentication succeed")
                }
            })
        } else {
            print("An error occured the user couldn't log in")
        }
    }

    func loginButtonDidLogOut(_ loginButton: FBSDKLoginButton!) {
        print("User just logged out from his Facebook account")
    }

    //creating the Twitter sign in button
    fileprivate func configureTwitterSignInButton() {
        let twitterSignInButton = TWTRLogInButton(logInCompletion: { session, error in
            if (error != nil) {
                print("Twitter authentication failed")
            } else {
                guard let token = session?.authToken else {return}
                guard let secret = session?.authTokenSecret else {return}
                let credential = TwitterAuthProvider.credential(withToken: token, secret: secret)
                Auth.auth().signIn(with: credential, completion: { (user, error) in
                    if error == nil {
                        print("Twitter authentication succeed")
                    } else {
                        print("Twitter authentication failed")
                    }
                })
            }
        })

        twitterSignInButton.frame = CGRect(x: 120, y: 400, width: view.frame.width - 240, height: 40)
        self.view.addSubview(twitterSignInButton)
    }
}
Now, let’s:
- switch to AppDelegate file,
- import the TwitterKit and
- instantiate Twitter with the consumer key and the consumer secret you got from the Twitter apps page and
- then you need to instantiate the Twitter authentication.
The list of imports in my AppDelegate file after adding TwitterKit looks like this:
import UIKit
import Firebase
import GoogleSignIn
import FBSDKCoreKit
import TwitterKit
The didFinishLaunchingWithOptions function after adding Twitter code looks like this:
func application(_ application: UIApplication, didFinishLaunchingWithOptions launchOptions: [UIApplicationLaunchOptionsKey: Any]?) -> Bool {

    FirebaseApp.configure()

    FBSDKApplicationDelegate.sharedInstance().application(application, didFinishLaunchingWithOptions: launchOptions)

    GIDSignIn.sharedInstance().clientID = FirebaseApp.app()?.options.clientID
    GIDSignIn.sharedInstance().delegate = self

    Twitter.sharedInstance().start(withConsumerKey: "consumer key here", consumerSecret: "secret key here")

    return true
}
we also need to edit the following function in AppDelegate file to add the support for Twitter Sign in button. Please note, that the function below also contains support for Facebook Sign in and Google Sign in buttons.
func application(_ app: UIApplication, open url: URL, options: [UIApplicationOpenURLOptionsKey : Any] = [:]) -> Bool {
        let googleAuthentication = GIDSignIn.sharedInstance().handle(url, sourceApplication:options[UIApplicationOpenURLOptionsKey.sourceApplication] as? String, annotation: [:])

        let facebookAuthentication = FBSDKApplicationDelegate.sharedInstance().application(app, open: url, sourceApplication: options[UIApplicationOpenURLOptionsKey.sourceApplication] as! String, annotation: options[UIApplicationOpenURLOptionsKey.annotation])

        let twitterAuthentication = Twitter.sharedInstance().application(app, open: url, options: options)

        return facebookAuthentication || twitterAuthentication || googleAuthentication
    }
and the complete AppDelegate file now looks like this:
//
//  AppDelegate.swift
//  SocialAuthentication
//
//  Created by com.swiftdeveloperblog on 20/11/2017.
//  Copyright © 2017 com.swiftdeveloperblog. All rights reserved.
//

import UIKit
import Firebase
import GoogleSignIn
import FBSDKCoreKit
import TwitterKit

@UIApplicationMain
class AppDelegate: UIResponder, UIApplicationDelegate, GIDSignInDelegate {

    var window: UIWindow?

    func application(_ application: UIApplication, didFinishLaunchingWithOptions launchOptions: [UIApplicationLaunchOptionsKey: Any]?) -> Bool {

        FirebaseApp.configure()

        FBSDKApplicationDelegate.sharedInstance().application(application, didFinishLaunchingWithOptions: launchOptions)

        GIDSignIn.sharedInstance().clientID = FirebaseApp.app()?.options.clientID
        GIDSignIn.sharedInstance().delegate = self

        Twitter.sharedInstance().start(withConsumerKey: "Consumer key here", consumerSecret: "secret key here")

        return true
    }

    func application(_ app: UIApplication, open url: URL, options: [UIApplicationOpenURLOptionsKey : Any] = [:]) -> Bool {
        let googleAuthentication = GIDSignIn.sharedInstance().handle(url, sourceApplication:options[UIApplicationOpenURLOptionsKey.sourceApplication] as? String, annotation: [:])

        let facebookAuthentication = FBSDKApplicationDelegate.sharedInstance().application(app, open: url, sourceApplication: options[UIApplicationOpenURLOptionsKey.sourceApplication] as! String, annotation: options[UIApplicationOpenURLOptionsKey.annotation])

        let twitterAuthentication = Twitter.sharedInstance().application(app, open: url, options: options)

        return facebookAuthentication || twitterAuthentication || googleAuthentication
    }

    func applicationWillResignActive(_ application: UIApplication) {
        // Sent when the application is about to move from active to inactive state. This can occur for certain types of temporary interruptions (such as an incoming phone call or SMS message) or when the user quits the application and it begins the transition to the background state.
        // Use this method to pause ongoing tasks, disable timers, and invalidate graphics rendering callbacks. Games should use this method to pause the game.
    }

    func applicationDidEnterBackground(_ application: UIApplication) {
        // Use this method to release shared resources, save user data, invalidate timers, and store enough application state information to restore your application to its current state in case it is terminated later.
        // If your application supports background execution, this method is called instead of applicationWillTerminate: when the user quits.
    }

    func applicationWillEnterForeground(_ application: UIApplication) {
        // Called as part of the transition from the background to the active state; here you can undo many of the changes made on entering the background.
    }

    func applicationDidBecomeActive(_ application: UIApplication) {
        // Restart any tasks that were paused (or not yet started) while the application was inactive. If the application was previously in the background, optionally refresh the user interface.
    }

    func applicationWillTerminate(_ application: UIApplication) {
        // Called when the application is about to terminate. Save data if appropriate. See also applicationDidEnterBackground:.
    }

    // Google Sign In
    func sign(_ signIn: GIDSignIn!, didSignInFor user: GIDGoogleUser!, withError error: Error!) {
        if (error) != nil {
            print("An error occured during Google Authentication")
            return
        }

        guard let authentication = user.authentication else { return }
        let credential = GoogleAuthProvider.credential(withIDToken: authentication.idToken,
                                                       accessToken: authentication.accessToken)
        Auth.auth().signIn(with: credential) { (user, error) in
            if (error) != nil {
                print("Google Authentification Fail")
            } else {
                print("Google Authentification Success")

                let mainStoryBoard: UIStoryboard = UIStoryboard(name:"Main", bundle:nil)
                let signInPage = mainStoryBoard.instantiateViewController(withIdentifier: "ProtectedPageViewController") as! ProtectedPageViewController
                let appDelegate = UIApplication.shared.delegate
                appDelegate?.window??.rootViewController = signInPage
            }
        }
    }

    func sign(_ signIn: GIDSignIn!, didDisconnectWith user: GIDGoogleUser!, withError error: Error!) {
        let firebaseAuth = Auth.auth()
        do {
            try firebaseAuth.signOut()
        } catch let signOutError as NSError {
            print ("Error signing out: %@", signOutError)
        }
    }
}
And this is it! If you run this application you should get your Twitter Sign in button working.
I hope that this short Swift programming tutorial was helpful for you. There is much more to learn about Firebase and I hope that the video courses below will also be of some value to you. Check them out and may be one of them will be just what you need.
Building Mobile Apps for iOS with Swift – Books
Happy learning!